W A R N I N G !
LENSES MAY BE INSERTED ONLY IN SPECIFIED MODELS AND PURSUANT TO THE FOLLOWING INSTRUCTIONS.
FAILURE TO COMPLY WILL ADVERSELY AFFECT THE OPTICAL PERFORMANCE AND THE LENSES MAY NOT REMAIN IN PLACE.
CAUSING INTERFERENCE WITH VISION.
FAST JACKET LENS CHANGING INSTRUCTIONS
FastJacketTM sunglasses were built with Switchlock Technology™ , meaning changing lenses to suit your environment is as easy as flipping a switch. Here's how:
Oakley Lens Removal
- Locate the switch near the left temple on your sunglasses.
- With your thumb, gently push the switch down.
- Take the lens between your thumb and index finger and gently slide it out, starting with the side closest to the switch.

Oakley Lens Installation
- Select a different lens and slide it into the lens slot, starting with the side closest to the nose.
- When the lens is in place, push the switch back to its upward, locked position.
- Repeat the same process with the right side.

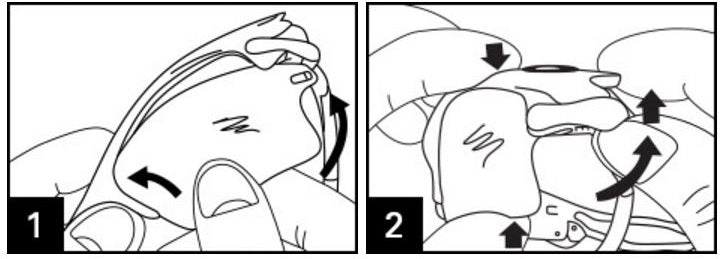
Oakley FLAK JACKET LENS CHANGING INSTRUCTIONS
Oakley Lens Removal
- Place index finger of one hand into nose bridge and place thumb, of same hand, on top of frame as shown; while holding lens with other hand.
- Flex nose bridge with index finger towards you while pushing top of the frame down with thumb as shown.
- With opposite hand, pull lens out of groove.

Oakley Lens Installation
- Hold frame and lens as shown and slide outer lens tab into frame.
- Align inner lens tab in frame groove and slide lens gently up into lens groove.
- Hold lens firmly and slide the thumb of opposite hand along top of frame until inner lens tab snaps firmly into place.

Oakley HALF JACKET LENS CHANGING INSTRUCTIONS
Oakley Lens Removal
- Grip the frame temple with one hand and the lens with the other.
- Pull the lens tab out of the frame temple. Remove the lens.

Oakley Lens Installation
- Grip the frame and lens. Fit the outer lens tab.
- Align the inner lens tab with the groove in the nose bridge.
- Holding the lens firmly, slide your thumb across the top of the frame until the inner lens tab snaps into the groove in the nose bridge.

Oakley RACING JACKET & SPLIT JACKET™ LENS CHANGING INSTRUCTIONS
Oakley Lens Removal | Replace one lens at a time.
- Grasp the nose pad near the bottom.
- Rotate the nose pad up.
- Grasp the lower jaw and rotate it down.
- Remove the lens.

Oakley Lens Installation
- Insert the replacement lens.
- Close the jaw.
- Rotate the nose pad down
- Snap it into the locked position.

Oakley M2, M FRAME & PRO M FRAME LENS REMOVAL INSTRUCTIONS
- Holding the center of the frame, pull the lens out from the middle.
- Squeezing the center of the frame, pop up one corner of the frame and lift it away from the lens.

Oakley O ROKR PRO LENS REMOVAL INSTRUCTIONS
- Grip the frame temple with one hand and the lens with the other.
- Pull the lens tab out of the frame temple. Remove the lens.

Oakley RADAR LENS REMOVAL INSTRUCTIONS
- With two fingers carefully pinch the two nose bridge tabs inward..
- Then push the nose bridge towards top of sunglasses until lens releases from top.
- Then pull lens down and out.

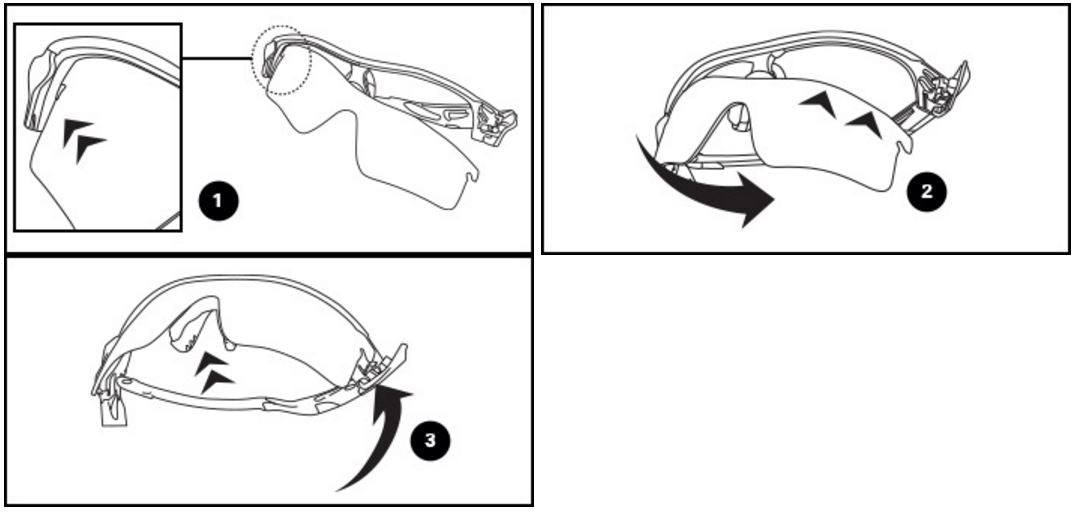
Oakley RADAR LOCK LENS REMOVAL INSTRUCTIONS
Oakley Lens Removal
- Locate lock latch on the inside surface of the left temple.
- With index finger and thumb, hold lock and door.
- Push lock and rotate door away from the lens (shown with arrows).
- Rotate temple and door as you're pushing the lock.
- Push nose bridge inwards to release bottom part of lens.
- Rotate lens towards the bottom to fully release lens

Oakley Lens Installation
- Insert top corner of lens in the lens groove corner (shown with arrows).
- Rotate lens and position it fully on the lens groove.
- Push nose bridge onto lens towards the outside.
- Rotate door closed

OAKLEY STYLESWITCH LENS REMOVAL INSTRUCTIONS
STYLESWITCHTM sunglasses were built with Switchlock Technology™, meaning changing lenses to suit your environment is as easy as flipping a switch. Here's how
Oakley Lens Removal
- Locate the switch on the left side of the nose pads on your sunglasses and lift it up.
- Open the lens section of your sunglasses using the hinge near the left temple.
- Take the lens between your thumb and index finger and gently slide it out, starting with the side closest to the hinge.

Oakley Lens Installation
- Select a different lens and slide it into the lens slot, starting with the side closest to the nose.
- When the lens is in place, close the lens section at the hinge and return the nose pad lock to its locked position.
- Repeat the same process with the right side.
THUMP PRO LENS REMOVAL INSTRUCTIONS
- Grip the frame temple with one hand and the lens with the other.
- Pull the lens tab out of the frame temple. Remove the lens.


